Manage Item by Barcode
First, define Table on Database. (See Step 2 on Quick Start Guide about how to do it)
Define Table AssetInfo like this.

Importa Table info. (See Step 3 on Quick Start Guide about how to do it)
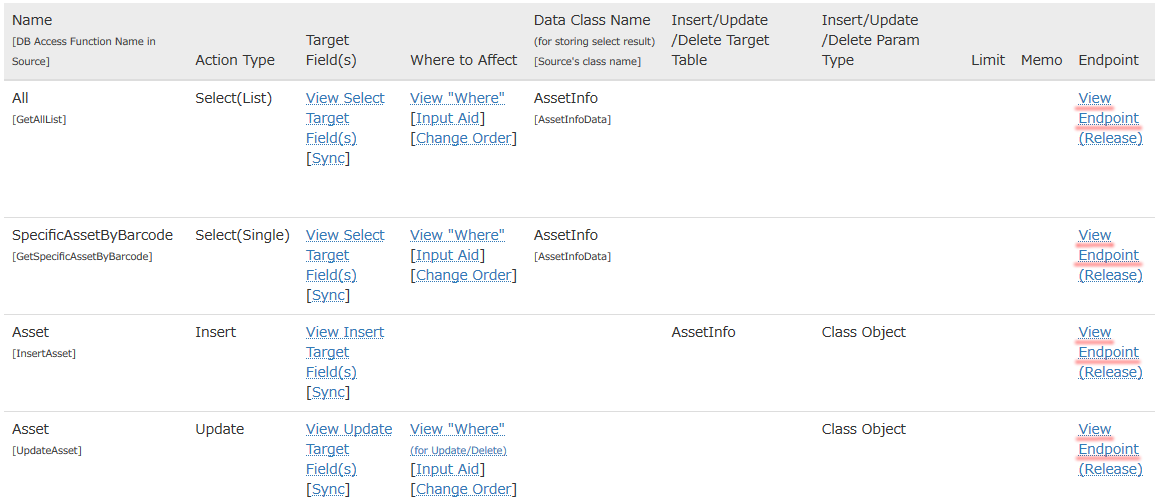
Next, define 4 functions.
■Get List

Get all field
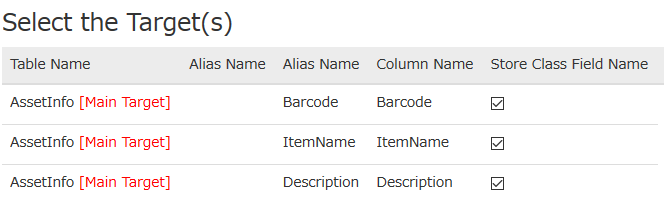
There is no Where condition. Get all record without condition exist in the table.
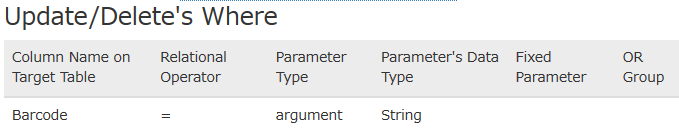
■Get single record (by barcode)

Get all field
Specify Barcode for the Where condtion.

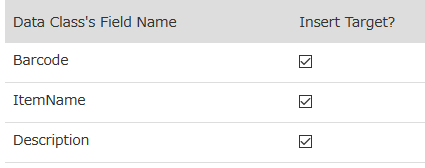
■Insert

Set all fields as a target of Insert.
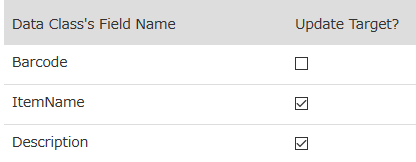
■Update

Update other fields except Barcode by specifying Barcode.
■Delete
It is supposed to delete in real function but we omit this to simplify example. To do this, you can do mostly as same as Update function.
Start Build. (See Step 5 on Quick Start Guide about how to do it)
After Build, Endpoint will be created.
Now DBaaS is ready. Next, prepare to read Barcode by HTML.
To read Barcode, use library WebCodeCamJQuery.
Now, let's create insert function at first. Use Endpoint of Insert function.

Following is a image for new insert
After read Barcode by Camera, Barcode is input automatically. So, please input Item Name and Discription and push "Insert Item" button, then data is inserted into Database.

Source Explanation
Load necessary module in HTML header.
<script src="js/jquery.js"></script>
<script src="js/qrcodelib.js"></script>
<script src="js/webcodecamjquery.js"></script>
Show Barcode in Canvas, then read it by module.
<canvas></canvas>   ← Show Camera image here.
<script>
    var arg = {
        resultFunction: function(result) {    ← After recognize Barcode, this event will be fired.
            $("#BARCODE").val(result.code);    ← Set Barcode in Input Form
            $("#INPUT_AREA").show();    ← Show Input Form (initially Form is invisible)
        }
    }
    $("canvas").WebCodeCamJQuery(arg).data().plugin_WebCodeCamJQuery.play();
</script>
入力フォームは以下です
<div id="INPUT_AREA" style="display:none"> ← Initial status of Input form is invisible
  Barcode: <input id="BARCODE" type="text"><br> ← Barcode Input
  Item Name: <input id="ITEMNAME" type="text"><br> ← Item Name Input
  Description:<input id="DESCRIPTION" type="text"><br> ← Description Input
  <input id="INSERT" type="button" value="Insert Item"> ← Insert(Add) Button
</div>
After pushing "Insert Item" button, following is a click event action.
<script>
$("#INSERT").click(function() {            <Define jQuery's click event>
    jQuery.ajax(                                 <From here, copy from Template>
        "https://dbaassandbox.matsuesoft.co.jp/??????/proxyserver-AssetInfo-InsertAsset.php",{
            type: "POST",
            dataType: 'json',
            contentType: 'application/json',
            data: JSON.stringify({
                "TOKEN": "???????",
                "AssetInfoObj": {
                    "Barcode": $("#BARCODE").val(),    ← Get Value from Form Input
                    "ItemName": $("#ITEMNAME").val(),    ← Get Value from Form Input
                    "Description": $("#DESCRIPTION").val(),    ← Get Value from Form Input
                }
            }),
            success: function(json_result){
                if (json_result._status == "OK") {
                    // Success
                } else {
                    // Failed
                }
            },
            error : function() {
                // Internal Error
            },
            complete: function() {
            }
        }
    );                         <Until here, copy from Template>
});
</script>
Now, let's add behaviour "Read data from Database into Form if data already exists". Use Endpoint of Select(Single).

Change source code as follows:
resultFunction: function(result) {
    $("#BARCODE").val(result.code);
    $("#ITEMNAME").val("");
    $("#DESCRIPTION").val("");
    jQuery.ajax(                                 <From here, copy from Template>
        "https://dbaassandbox.matsuesoft.co.jp/??????/proxyserver-AssetInfo-GetSpecificAssetByBarcode.php",{
            type: "POST",
            dataType: 'json',
            contentType: 'application/json',
            data: JSON.stringify({
                "TOKEN": "?????",
                "param_AssetInfo_Barcode_where": result.code             ← Get data by specifying Barcode here.
            }),
            success: function(json_result){
                if (json_result._status == "OK") {
                    // Success
                    $("#ITEMNAME").val(json_result.Result.ItemName);              ← Set value in Input Form as a Initial Value after get data from Database
                    $("#DESCRIPTION").val(json_result.Result.Description);        ← Set value in Input Form as a Initial Value after get data from Database
                } else {
                    // Failed
                }
            },
            error : function() {
                // Internal Error
            },
            complete: function() {
            }
        }
    );                       <Until here, copy from Template>
    $("#INPUT_AREA").show();
}
By this, corresponding data is displayed into window by accessing DBaaS after recognize Barcode.
Next, add behaviour to update data.
To simplify example, now add "Update" button. Add button alongside of existing Update button.
<div id="INPUT_AREA" style="display:none">
  Barcode: <input id="BARCODE" type="text"><br>
  Item Name: <input id="ITEMNAME" type="text"><br>
  Description:<input id="DESCRIPTION" type="text"><br>
  <input id="INSERT" type="button" value="Insert Item">
  <input id="UPDATE" type="button" value="Update Item">
</div>
Following is a code for Update Button event.
<script>
  $("#UPDATE").click(function() {            <Define jQuery's click event>
    jQuery.ajax(                               <From here, copy from Template>
        "https://dbaassandbox.matsuesoft.co.jp/matsue_yeivxx5azxpurhwb2bvbspss1yk3bm2j/proxyserver-AssetInfo-UpdateAsset.php",{
            type: "POST",
            dataType: 'json',
            contentType: 'application/json',
            data: JSON.stringify({
                "TOKEN": "AvJJNtJWRvzhqFGB5FLcIQQga6JOzOV6",
                "AssetInfoObj": {
                    "ItemName": $("#ITEMNAME").val(),    ← Get Value from Form Input
                    "Description": $("#DESCRIPTION").val(),    ← Get Value from Form Input
                    "Barcode": $("#BARCODE").val()    ← Get Value from Form Input
                }
            }),
            success: function(json_result){
                if (json_result._status == "OK") {
                    // Success
                } else {
                    // Failed
                }
            },
            error : function() {
                // Internal Error
            },
            complete: function() {
            }
        }
    );                     <Until here, copy from Template>
  });
</script>
By pushing Update button, data will be updated where Barcode is matched.
To show all data, it is almost as same as Example 「Read Data by HTML(jQuery)」. So, it is omitted. It's good to try to create it for your understanding. It's easy task.
In this example, some exceptional code is omitted. So, you can add duplicated recode or error handling is insufficient but you can use many kind of applications by using this sample such as Selling Item Management, Stock Management or Asset Management.
■Note
On 2016, Camera on Browser is not stable or unsupported based on Browser, Version or OS. So, it is not recommended to use camera by HTML for critical application.
This module to read Barcode is easy to use. So it is good for example but recognizing quality and speed is not good. So, it is not recommended to use this library for critical application. We recommend dedicated hardware for critical purposes.